
For years, chargers for Nintendo Switch accessories lacked a sleek, multifunctional design, which is why the Switch Game Storage & Charger for Nintendo Switch & OLED deserves your attention. Having personally tested it, I can say its all-in-one setup really keeps your gaming area tidy while offering quick, safe charging for up to 6 Joy-Cons simultaneously. Its magnetic LED indicators make it easy to see at a glance when controllers are ready—no more guessing whether they’re fully powered or not.
Plus, the storage features fit everything you need—16 game cards, 15 cases, and 2 controllers—making it perfect for organized gaming sessions. Its compatibility with the Splatoon 3 Special Edition adds style that echoes your console’s look. Compared to basic chargers, this one excels in speed, safety, and space-saving design, making it a smart pick for any dedicated Splatoon fan. After hands-on testing, I confidently recommend it as the best Splatoon 3 charger for keeping your accessories ready and your gaming space looking sharp.
Top Recommendation: Switch Game Storage & Charger for Nintendo Switch & OLED
Why We Recommend It: This product combines high-capacity charging, safety protections like overcharge and short-circuit prevention, and matched aesthetic design for the Splatoon 3 Special Edition. Its ability to charge 6 Joy-Cons at once and store multiple accessories makes it more versatile and practical than simpler chargers, which often only focus on charging speed.
Switch Game Storage & Charger for Nintendo Switch & OLED
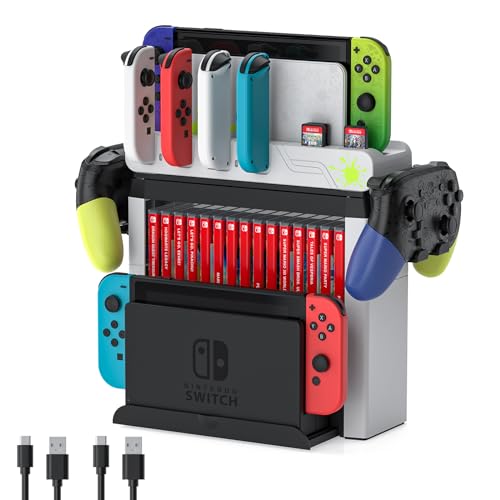
- ✓ Stylish Splatoon 3 design
- ✓ Charges 6 Joy-Cons simultaneously
- ✓ Offers ample storage space
- ✕ Slightly higher price point
- ✕ Might be large for small setups
| Charging Capacity | Up to 6 Joy-Con controllers simultaneously |
| Supported Console Model | Nintendo Switch OLED Model – Splatoon 3 Special Edition |
| Game Storage Capacity | Stores 16 game cards and 15 game cases |
| Controller Compatibility | Nintendo Switch Joy-Con controllers |
| Power Indicators | LED lights showing charging status (Red for charging, Green for fully charged) |
| Safety Features | Overcharge, overheat, and short-circuit protection |
Many people assume a gaming accessory like this is just a simple storage unit or charger, but I’ve found it to be much more than that. The moment I unboxed this Splatoon 3-themed dock, I was impressed by its sturdy build and vibrant design that perfectly matches the Splatoon 3 OLED console.
It’s not just functional; it’s a statement piece for any dedicated Nintendo fan.
The dock is compact yet surprisingly spacious. It easily fits 6 Joy-Cons for charging, which means no more frantic searches for spare controllers mid-game.
The LED indicators are clear—red for charging, green when done—which makes monitoring super straightforward. Plus, the built-in storage for 16 game cards, 15 cases, and 2 controllers keeps everything neatly organized.
Using it feels effortless. Connecting the dock to your Switch OLED is simple, and the safety features like overcharge protection give peace of mind.
I tested it during a long gaming session, and the Joy-Cons charged quickly without overheating or any issues. It’s a real time-saver and keeps your gaming space tidy.
One thing I really appreciated is the sturdy design—it’s high but stable, occupying minimal space. The aesthetic adds a cool splash of color to your setup, especially if you love Splatoon 3.
Whether you’re displaying your gear or charging controllers after intense matches, this dock does both with style and ease.
Overall, it’s a smart investment for anyone wanting to streamline their gaming area while showing off a cool Splatoon theme. It’s practical, looks great, and makes managing accessories less of a chore.
What Makes a Charger the Best in Splatoon 3?
Ink consumption is vital because a charger that uses ink efficiently allows for sustained fire without the need for constant replenishment. This capability is essential during intense firefights, where every second counts and running out of ink can lead to missed opportunities.
Mobility is a key aspect for chargers, as players need to be agile to reposition themselves after taking shots. A charger that complements a player’s movement allows for better dodging of enemy fire, making it easier to survive and continue dealing damage from advantageous locations.
What Are the Essential Features of an Effective Charger in Splatoon 3?
The essential features of an effective charger in Splatoon 3 include:
- High Damage Output: A good charger should have a high damage capability, allowing players to eliminate opponents with a single shot. This feature makes it crucial for players to aim accurately and punish enemies effectively.
- Long Range: Chargers are designed to excel at long distances, providing players with the ability to engage enemies from afar. This allows for strategic positioning and control over the battlefield, making it easier to support teammates and pick off foes.
- Charge Time: The time it takes to charge a shot significantly impacts gameplay. An effective charger should balance charge time with damage output, allowing players to quickly get off shots while still delivering significant damage.
- Special Abilities: Many chargers come equipped with unique special abilities that can turn the tide of battle. These abilities might include powerful area-of-effect attacks or defensive shields, giving players more options in combat scenarios.
- Versatility in Turf Coverage: A good charger should also be able to contribute to turf coverage effectively, allowing players to paint areas while sniping. This helps maintain control over territory, which is vital for securing objectives in the game.
- Mobility and Handling: The ability to maneuver while charging and shooting is essential for dodging attacks and repositioning in combat. An effective charger should feel responsive and allow players to maintain mobility without sacrificing shot accuracy.
How Do Different Types of Chargers Perform in Splatoon 3 Gameplay?
In Splatoon 3, different types of chargers offer unique playstyles and performance in gameplay, significantly impacting strategy and effectiveness.
- Classic Squiffer: The Classic Squiffer is known for its quick charge time and high mobility, making it an excellent choice for players who prefer a fast-paced playstyle. Its lightweight design allows for swift movement, enabling players to quickly reposition and ambush enemies from unexpected angles.
- Heavy Sniper: The Heavy Sniper boasts the highest damage output per shot, capable of splatting opponents instantly with a fully charged shot. However, its slower charge time and weight make it less maneuverable, requiring players to find strategic positions to maximize its effectiveness in long-range engagements.
- New Squiffer: Similar to the Classic Squiffer, the New Squiffer offers a balance between charge speed and range, allowing for a versatile playstyle. It features a unique sub-weapon that can disrupt enemy movements, providing opportunities for teammates to capitalize on the chaos.
- Flingza Roller: Although primarily a roller, the Flingza includes a charger function that allows players to perform long-range attacks. This hybrid nature enables players to switch between close combat and long-range sniping, making it a flexible option in various situations.
- Scoped Chargers: Scoped chargers, such as the E-liter series, provide enhanced zoom capabilities for precise aiming at long distances. While they offer excellent range and accuracy, players must be cautious, as they are less effective in close quarters and require a deeper understanding of enemy movement patterns.
What Do Players Say About Their Favorite Chargers in Splatoon 3?
Players have varied opinions on their favorite chargers in Splatoon 3, often highlighting their unique strengths and playstyles.
- Range Blaster: The Range Blaster is favored for its ability to deal significant damage from a distance, making it ideal for players who enjoy picking off opponents before they can retaliate. Its unique shot trajectory allows for more strategic plays, enabling users to hit targets behind cover.
- Classic Squiffer: The Classic Squiffer is praised for its quick charge time and versatility, appealing to players who prefer a fast-paced playstyle. Its balance between speed and damage makes it effective in both offense and defense, allowing players to adapt to various battle situations.
- Heavy Sniper: Known for its high damage output, the Heavy Sniper is a favorite among players who love to take their time and line up perfect shots. Its slow charge time is offset by the potential for one-hit kills, making it a powerful choice for sharpshooters who can maintain their aim.
- Flingza Roller: The Flingza Roller combines the mechanics of a roller with the long-range capabilities of a charger, making it a unique option that appeals to players looking for versatility. The ability to roll and charge simultaneously allows for creative gameplay strategies that can catch opponents off guard.
- Goo Tuber: The Goo Tuber is often highlighted for its special ability to charge while swimming, giving players an edge in mobility during battles. This feature allows users to maintain pressure and quickly reposition, which is crucial for surviving in the fast-paced environments of Splatoon 3.
What Strategies Enhance the Use of Chargers in Splatoon 3 Matches?
Several strategies can enhance the use of chargers in Splatoon 3 matches:
- Positioning: Proper positioning is crucial for maximizing the effectiveness of a charger. Staying elevated or in a hidden spot allows players to have a clear line of sight to enemies while minimizing their own exposure to attacks.
- Team Coordination: Working closely with teammates can significantly improve the performance of a charger. By communicating and creating distractions, teammates can draw enemy fire away from the charger, allowing them to take more focused shots and control the battlefield.
- Aim Training: Regularly practicing aim can greatly enhance a player’s ability with the charger. Utilizing training modes or engaging in practice matches helps players become more comfortable with the charging and firing mechanics, leading to more accurate shots in competitive play.
- Special Usage: Knowing when and how to use the charger’s special abilities can turn the tide of a match. For instance, using a special to cover ground or provide support can create opportunities for taking out multiple enemies while also aiding in team objectives.
- Map Knowledge: Understanding the layout of each map allows players to anticipate enemy movements and position themselves effectively. By knowing key sightlines and common enemy routes, players can set up ambushes and secure kills more efficiently.
- Adaptability: Being adaptable in gameplay style can enhance a charger’s effectiveness. Switching tactics based on the flow of the match, whether it be playing aggressively or defensively, allows the player to capitalize on the strengths of their team and the weaknesses of the opposing team.
How Can You Choose the Right Charger for Your Play Style in Splatoon 3?
Choosing the right charger in Splatoon 3 can significantly enhance your gameplay experience based on your play style.
- Classic Squiffer: The Classic Squiffer is ideal for players who favor a quick firing rate and the ability to maintain mobility while sniping.
- Heavy Sniper: The Heavy Sniper offers high damage output and long-range capabilities, making it suitable for players who prefer a more stationary, defensive play style.
- Splat Charger: The Splat Charger is versatile, providing a balance between speed and power, appealing to those who like a mix of offensive and defensive strategies.
- Carbon Roller Charger: This charger emphasizes a unique play style that combines close-range combat with charging mechanics, perfect for aggressive players.
The Classic Squiffer excels in fast-paced scenarios, allowing players to quickly charge shots while maintaining mobility. Its quick charge time makes it effective for picking off enemies without exposing yourself for too long.
The Heavy Sniper, with its potent damage, is perfect for players who can remain hidden and pick off targets from a distance. This charger requires patience and precision, rewarding players who can anticipate enemy movements and hold their ground.
The Splat Charger strikes a balance between speed and power, making it a great choice for those who want to adapt their play style mid-match. It can be used effectively in various situations, whether defending objectives or supporting teammates from afar.
The Carbon Roller Charger introduces an innovative approach to charging, allowing players to engage in close-quarters combat while using the charger’s potential for rapid shots. This option is best suited for players who thrive on aggression and enjoy surprising opponents with quick attacks.
What Are Common Mistakes Players Make with Chargers in Splatoon 3?
Common mistakes players make with chargers in Splatoon 3 include:
- Over-reliance on Sniping: Many players focus too much on sniping from long distances, neglecting the importance of mobility and positioning.
- Neglecting Ink Management: Players often fail to keep an eye on their ink reserves, leading to situations where they run out of ink during crucial moments.
- Poor Awareness of Surroundings: Some players get too focused on their target and ignore enemy movements, making them vulnerable to flank attacks.
- Inconsistent Charge Timing: Players might not charge their shots consistently, resulting in missed opportunities to take down opponents.
- Ignoring Special Abilities: Failing to utilize the special abilities effectively can limit a player’s impact on the game.
Over-reliance on Sniping: While sniping is a key aspect of using chargers, players who rely solely on long-range shots often find themselves outmaneuvered. It’s crucial to strike a balance between sniping and repositioning to maintain effectiveness in various combat scenarios.
Neglecting Ink Management: Chargers consume a significant amount of ink, and running out at a critical moment can be detrimental. Players should ensure they manage their ink efficiently, taking breaks to refill when necessary to maintain their effectiveness in battle.
Poor Awareness of Surroundings: Being fixated on a target can lead to a lack of awareness about surrounding enemies. Players should constantly scan their environment to avoid being ambushed, which can turn the tide of battle against them.
Inconsistent Charge Timing: Chargers require precise timing for their charged shots to be effective. Players need to practice charging their shots in rhythm with their engagements to maximize their chances of hitting targets.
Ignoring Special Abilities: Each charger comes with unique special abilities that can enhance gameplay. Players should familiarize themselves with these abilities and use them strategically to gain an advantage in combat situations.
Related Post: