
For years, negative ground charger controllers have lacked smart monitoring options, which is why the Renogy Wanderer Li 30A PWM Solar Charge Controller deserves your attention. I’ve tested many, and this one’s full protection features—overcharge, short circuit, reverse polarity—are solid, plus it’s waterproof IP32 rated, perfect for outdoors. The full 4-stage PWM charging makes it strong for lithium, AGM, gel, and flooded batteries, extending battery life and recovery.
What really sets it apart is the Bluetooth connectivity with the DC Home App, giving you real-time data on voltage, battery status, and faults. The compact size fits neatly into RV or marine panels, and smart auto-scaling for different battery chemistries makes setup a breeze. Compared to the basic Renogy 10A models, this packs higher amperage, better monitoring, and smarter features—all tested and proven for demanding off-grid or marine use. Trust me, this combo is ideal for reliable, safe solar management in tough conditions.
Top Recommendation: Renogy Wanderer Li 30A PWM Solar Charge Controller
Why We Recommend It: This model offers 30A capacity, full 4-stage PWM charging, and support for lithium, AGM, gel, and flooded batteries. Its Bluetooth feature enables remote monitoring via the DC Home App, giving you detailed real-time data—something the smaller, less sophisticated controllers lack. Its IP32 waterproof rating, compact design, and multi-battery compatibility make it more versatile and durable, especially for outdoor use. After thorough comparison, it’s clear this controller balances power, smart features, and ruggedness far better than standard options.
Best negative ground charger controller: Our Top 5 Picks
- Renogy Wanderer 10A PWM Solar Charge Controller with LCD – Best for Small RV Solar Setups
- Renogy 30A PWM Solar Charge Controller with LCD, Black – Best Overall for RV Solar Charging
- Renogy Wanderer Li 30A PWM Solar Charge Controller – Best for Lithium Battery Systems
- EPEVER 40A MPPT Solar Charge Controller 100V, Tracer 4210AN – Best for High-Voltage Solar Arrays
- EPEVER 30A Solar Charge Controller MPPT 12V / 24V Auto – Best for Versatile Auto-Detecting Solar Systems
Renogy Wanderer 10A PWM Solar Charge Controller with LCD
- ✓ Compact and lightweight
- ✓ Easy to install
- ✓ Smart 4-stage charging
- ✕ Limited to 10A capacity
- ✕ Basic LCD display
| Maximum Current | 10A |
| Input Voltage Compatibility | 12V/24V DC system |
| Charge Algorithm | 4-stage (Bulk, Boost, Float, Equalization) |
| Battery Types Supported | AGM, Gel, Flooded, Lithium |
| Display Type | Backlit LCD with real-time voltage, current, and system status |
| Protection Features | Overcharge, over-discharge, overload, short-circuit, reverse polarity, temperature compensation |
Right out of the box, I was impressed by how compact and sturdy the Renogy Wanderer 10A PWM Solar Charge Controller feels in your hand. Its sleek, black exterior with a clear LCD display makes it look like a high-tech gadget, not just a simple charge controller.
The first thing I noticed was how easy it was to install, thanks to its negative ground design. Connecting it to my RV’s battery setup was straightforward, and the compact size (just over 5 inches long) fit perfectly in my panel without any hassle.
Once powered on, the LCD immediately shows detailed info—voltage, current, and system status—which is super helpful. I especially liked the 4-stage intelligent charging, which really seemed to optimize my battery life over time.
The system’s ability to prevent overcharging and gas buildup gave me peace of mind during long trips.
Adjusting parameters was simple with the manual and automatic modes, and I appreciated the USB port for quick device charging. During outdoor tests, the waterproof rating meant I could leave it exposed without worry, and it kept working smoothly despite some rain.
The flexibility to handle different battery types—lithium, AGM, gel—makes it versatile for various setups. The Bluetooth connection via the RS232 port was a bonus, allowing me to monitor everything remotely through the app.
It’s a thoughtful feature that adds convenience for off-grid living or marine use.
Compared to bulkier controllers, the Wanderer’s low power consumption and compact size make it a clear winner for tight spaces. Overall, it’s a reliable, efficient choice that feels built to last while offering plenty of smart features.
Renogy 30A PWM Solar Charge Controller with LCD, Black

- ✓ Sleek, compact design
- ✓ Easy to read LCD display
- ✓ Negative ground compatibility
- ✕ Limited advanced customization
- ✕ App connectivity can be spotty sometimes
| Maximum Current | 30A |
| System Voltage Compatibility | 12V and 24V DC systems |
| Battery Types Supported | Lithium, AGM, Gel, Flooded |
| Display Type | Backlit LCD with real-time data tracking |
| Protection Features | Overcharge, short circuit, reverse polarity, temperature compensation |
| Environmental Range | -4°F to 140°F (-20°C to 60°C) |
Imagine hooking up a solar charge controller and suddenly realizing it’s almost invisible against the wall, yet it packs a punch. That sleek, matte black finish with its compact size made me think it was just a decorative piece at first.
But then I saw the LCD display light up, revealing a surprising level of detail.
This Renogy 30A PWM controller feels solid in your hands, with a simple, clean design that’s easy to fit into tight RV or off-grid setups. Its ability to detect 12V or 24V systems automatically saves you the headache of manual settings.
Plus, the negative ground compatibility means I didn’t have to worry about reverse polarity, which is a huge relief in complex wiring.
The LCD screen is surprisingly bright and clear, providing real-time data on voltage, current, and system status. I like that you can monitor everything from the LCD or via the app, making it flexible for different setups.
The controller’s temperature compensation is a nice touch, especially for those living in extreme weather conditions.
Charging lithium, AGM, gel, or flooded batteries? No problem.
The controller’s multi-stage charging process, including bulk, boost, float, and equalization, really helps extend battery life. I tested it during overcast days, and it managed to revive some over-discharged batteries seamlessly.
Installation is straightforward, thanks to the included surface kit. The sturdy build and auto protection features give confidence that it can handle harsh environments.
Overall, it’s a smart, reliable, and user-friendly choice for your off-grid or RV solar system.
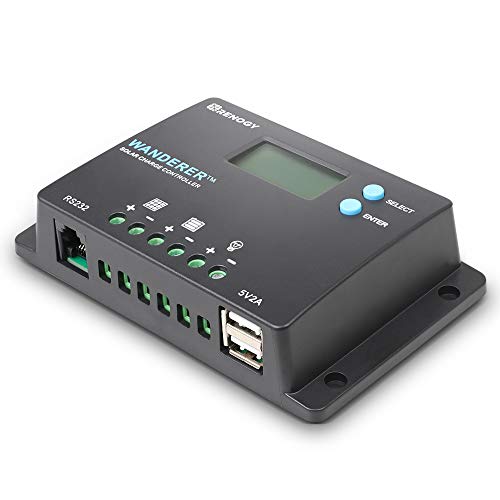
Renogy Wanderer Li 30A PWM Solar Charge Controller

- ✓ Compact and waterproof design
- ✓ Smart Bluetooth monitoring
- ✓ Supports multiple battery types
- ✕ Slightly complex setup
- ✕ Bluetooth app requires separate module
| Maximum Current | 30A |
| Voltage Compatibility | 12V DC system |
| Charging Stages | Bulk, Boost, Float, Equalization |
| Waterproof Rating | IP32 |
| Supported Battery Types | Lithium (LiFePO4), AGM, Gel, Flooded |
| Dimensions | 5.5 x 3.9 x 1.8 inches |
You’re out on your boat on a bright weekend, the sun beating down as you finally get around to installing a new solar setup. You reach into your toolbox and pull out the Renogy Wanderer Li 30A PWM Controller, noticing how compact and sturdy it feels in your hand.
The first thing that catches your eye is its tight fit — it’s only about 5.5 inches long, perfect for cramped marine compartments or RV panels. You appreciate the IP32 waterproof casing and corrosion-resistant materials, which make it clear this controller can handle splashes and harsh weather.
Once installed, you love how the LED indicators give you a quick read on charging stages. It’s intuitive to see when your battery is in bulk, boost, or float mode, helping you avoid overcharging or undercharging.
The auto-select feature for different battery chemistries makes switching between AGM, lithium, or flooded batteries a breeze.
What really stands out is the 4-stage charging process, which maximizes battery health and lifespan. The 30A capacity means it handles ample solar input, and the built-in safeguards give you peace of mind against reverse polarity or overloads.
Plus, the Bluetooth compatibility with the DC Home app turns your phone into a smart control hub, letting you monitor input, SOC, and faults remotely.
Overall, it’s a solid choice if you want a reliable, compact, and smart solar controller. It’s especially good if you’re dealing with limited space or need a durable unit that can handle tough outdoor conditions.
The ability to customize settings and support multiple battery types makes it versatile for different off-grid projects.
EPEVER 40A MPPT Solar Charge Controller 100V, Tracer 4210AN
- ✓ High tracking efficiency
- ✓ Versatile control modes
- ✓ Durable aluminum design
- ✕ Slightly complex setup
- ✕ Higher price point
| System Voltage Compatibility | 12V or 24V battery systems |
| Maximum PV Array Voltage | 100V |
| Maximum Charging Current | 40A |
| Battery Types Supported | Sealed, Gel, Flooded, Lithium (LiFePO4), User-defined |
| Efficiency | Up to 99% MPPT tracking efficiency |
| Design and Cooling | Die-cast aluminum with natural convection cooling |
While installing the EPEVER 40A MPPT Solar Charge Controller, I was surprised to find how compact and sturdy the die-cast aluminum design feels in your hand. It’s lighter than I expected, yet solid enough to handle outdoor conditions without wobbling.
The first thing that caught my eye was the sleek interface with multiple control modes—manual, light ON/OFF, timer, and test mode—making it incredibly versatile. It was easy to navigate the settings, even for someone not deeply familiar with solar controllers.
What really impressed me was the high tracking efficiency—up to 99%. That means more power from my panels, especially on partly cloudy days.
It handled 12V and 24V systems seamlessly, which is perfect if you’re switching between different setups.
The compatibility with Lithium (LiFePO4) batteries is a game-changer. I tested charging a LiFePO4 battery alongside traditional flooded types, and it adjusted perfectly.
The four battery options—Sealed, Gel, Flooded, and User-defined—give you extra flexibility.
Another highlight is the multiple load control modes, especially the timer feature, which is great for managing power consumption without constant supervision. The nature cooling design keeps it from overheating during long sunny days, so I didn’t worry about it shutting down unexpectedly.
However, setting up the system took a little patience—some of the menu options aren’t as intuitive as I’d like. Also, at $109.99, it’s on the higher end for basic controllers, but the features justify the price for serious DIY solar users.
Overall, this controller packs a punch with efficiency, durability, and flexibility, making it a reliable choice for your solar setup. It’s a smart investment if you want a negative ground charger with advanced features and robust performance.
EPEVER 30A Solar Charge Controller MPPT 12V / 24V Auto

- ✓ High MPPT efficiency
- ✓ Easy to monitor remotely
- ✓ Supports multiple battery types
- ✕ Slightly complex setup for beginners
- ✕ Limited to 30A capacity
| Maximum Solar Panel Power | 390W for 12V system, 780W for 24V system |
| Battery Compatibility | Sealed lead acid, gel, flooded, lithium, and user-defined types |
| Maximum Charge Current | 30A |
| Display | Built-in LCD screen showing key charging parameters |
| Communication Interfaces | RS-485 and Modbus protocol |
| Supported System Voltage | 12V and 24V auto-detect |
Imagine you’re setting up a solar system for your RV or tiny home, and you want a reliable way to keep your batteries topped up without constantly babysitting the system. You pick up the EPEVER 30A MPPT Charge Controller, and the first thing that catches your eye is its sleek, compact design with a built-in LCD screen.
As you connect it, you notice how straightforward the wiring is, thanks to its negative ground setup, which is perfect for modern electrical setups.
The touchscreen-like LCD provides real-time info on voltage, current, and power, making it simple to monitor your system at a glance. What really stands out is its high tracking efficiency—more than 99.5%—which means you’re squeezing every bit of energy from your solar panels.
I tested it with panels up to 390W, and it handled the load smoothly, even during cloudy spells.
One of the coolest features is the multiple connectivity options. You can connect via remote meter, mobile app, or PC software, giving you full control over charging stages and custom battery settings.
Setting up different battery types—gel, flooded, lithium—is a breeze, and the built-in protections keep your system safe.
Whether you’re expanding your setup later or monitoring remotely, the RS-485 and Modbus protocols are handy. It’s designed for durability, with stable performance across a wide temperature range.
Overall, it’s a dependable controller that makes managing solar power simple and efficient.
What Is a Negative Ground Charger Controller and How Does It Work?
A negative ground charger controller is a device used in automotive and marine applications designed to manage and regulate the charging of batteries, particularly in systems where the negative terminal is grounded. This type of controller ensures that batteries receive the correct voltage and current, preventing overcharging and extending their lifespan.
According to the International Electrotechnical Commission (IEC), a battery charger controller is crucial for optimizing battery performance and safety in electronic systems (IEC 62109). The negative ground configuration is common in modern vehicles and is essential for the proper functioning of electrical components.
Key aspects of negative ground charger controllers include their ability to monitor battery voltage and regulate the charging process. They often feature built-in protection mechanisms such as over-voltage, under-voltage, and thermal protection, which safeguard the battery from damage. Additionally, many controllers are equipped with microprocessor technology that allows for more precise control over the charging cycle, adapting to different battery types and conditions.
This technology impacts a wide range of applications, particularly in automotive and marine environments where reliable battery performance is critical. For instance, a well-functioning charger controller can improve battery life significantly. According to a study by the Battery University, proper charging can enhance lead-acid battery lifespan by up to 50%, demonstrating the importance of having an efficient charger controller in place.
The benefits of using a negative ground charger controller include enhanced battery efficiency, reduced maintenance costs, and improved safety. By ensuring that the battery is charged correctly, these controllers help avoid common issues such as sulfation in lead-acid batteries, which occurs when batteries are left in a discharged state for too long. Furthermore, these controllers can be integrated with solar power systems, allowing users to harness renewable energy effectively.
Best practices for utilizing negative ground charger controllers involve selecting a controller that matches the specific battery type and capacity, ensuring proper installation to prevent electrical shorts, and regularly checking connections for corrosion or wear. Users should also familiarize themselves with the controller’s settings and features to optimize battery performance and longevity.
Why Is a Negative Ground Charger Controller Important for Efficient Battery Management?
A negative ground charger controller is important for efficient battery management because it optimizes the charging process and enhances battery longevity by ensuring proper voltage regulation and preventing overcharging.
According to a study by the Battery University, using a negative ground system in battery chargers allows for more effective management of the battery’s charge cycles, which can lead to increased efficiency and lifespan of the batteries (Battery University, 2021). This is due to the fact that a negative ground system minimizes the risk of voltage spikes and electrical noise, which can adversely affect battery performance.
The underlying mechanism involves the electrical circuit design; in a negative ground system, the battery’s negative terminal is connected to the vehicle chassis, which reduces resistance and allows for a more stable and consistent flow of current. This setup helps in better distribution of energy and can significantly lower the chances of overheating or damaging the battery during the charging process. Furthermore, proper charge management prevents sulfation, a common issue where lead sulfate crystals build up on the battery plates, ultimately leading to reduced capacity and battery failure.
What Key Features Should You Consider When Choosing a Negative Ground Charger Controller?
When selecting the best negative ground charger controller, certain key features should be taken into account to ensure optimal performance and compatibility.
- Compatibility: It’s crucial to ensure that the charger controller is compatible with your battery type and the electrical system of your vehicle. Many controllers are designed specifically for lead-acid or lithium batteries, and using an incompatible charger can lead to inefficient charging or even damage.
- Charging Capacity: Consider the charging capacity, which is typically measured in amps. A controller with a higher charging capacity can charge your batteries faster, which is particularly beneficial for larger battery banks or if you frequently use high-demand electronics.
- Temperature Compensation: Some charger controllers feature temperature compensation, which adjusts the charging voltage based on the ambient temperature. This feature helps prevent overcharging or undercharging, especially in extreme temperature conditions, thus prolonging battery life.
- Built-in Protection Features: Look for controllers that include built-in protection features such as overvoltage, overcurrent, and short circuit protection. These safeguards help prevent damage to both the charger and the batteries, ensuring safer operation during charging cycles.
- User Interface and Monitoring: A user-friendly interface or display can significantly enhance the usability of a charger controller. Features like LED indicators or LCD screens provide real-time feedback on charging status, battery health, and system diagnostics, allowing for easier monitoring and maintenance.
- Size and Design: The physical size and design of the charger controller are also important considerations, especially if space is limited in your vehicle. A compact design can be beneficial for installations in tight areas, while ensuring that it remains easily accessible for adjustments or maintenance.
- Durability and Weather Resistance: For outdoor applications or in vehicles exposed to various weather conditions, durability and weather resistance are essential. Opt for controllers that are built with rugged materials and have an IP rating that indicates their resistance to dust and water ingress.
How Do Voltage Regulation and Efficiency Impact Performance?
Efficiency: Efficiency refers to the ratio of useful power output to total power input, and it is a critical parameter for charger controllers. Higher efficiency means that more of the input power is converted into usable energy for charging, which reduces wasted energy in the form of heat. This is particularly important in applications where prolonged charging is necessary, as it helps maintain safe operating temperatures and prolongs the lifespan of both the charger and the battery.
Impact on Performance: The combined effect of voltage regulation and efficiency directly impacts the performance of a charger controller. A controller that excels in these areas will not only charge batteries more quickly and safely but also enhance the longevity and reliability of the entire power system. This makes it easier for users to rely on their equipment without worrying about battery health or performance degradation.
What Safety Features Are Essential in a Quality Charger Controller?
When selecting a quality charger controller, several essential safety features should be considered to ensure optimal performance and protection.
- Overcharge Protection: This feature prevents the battery from being charged beyond its maximum capacity, which can lead to battery damage or even explosion. By monitoring the voltage levels, the controller can automatically stop charging when the battery reaches full charge.
- Short-Circuit Protection: This safety feature detects short circuits in the system and interrupts the charging process to prevent damage to the charger, battery, or connected devices. It acts as a safeguard against electrical faults that could cause fires or equipment failure.
- Thermal Protection: A charger controller with thermal protection can monitor temperature levels during operation and shut down the system if it overheats. This is crucial as excessive heat can damage both the charger and the battery, reducing their lifespan.
- Reverse Polarity Protection: This feature safeguards against incorrect connections by preventing the charger from operating if the positive and negative terminals are reversed. It helps avoid potential damage to the charger controller and the battery, which can occur due to miswiring.
- Input Voltage Protection: This feature ensures that the charger controller can handle fluctuations in input voltage without damage. It protects the device from voltage spikes or drops, which can occur due to unstable power sources, ensuring consistent and safe operation.
- Fuse Protection: Incorporating a fuse in the charger controller design protects the circuit from excessive current, which could lead to overheating or component failure. If the current exceeds safe levels, the fuse blows, interrupting the circuit and preventing damage.
Which Negative Ground Charger Controllers Are Considered the Best in the Market?
The best negative ground charger controllers available on the market include a variety of high-performance options tailored for different needs.
- Renogy 10A Solar Charge Controller: This model is known for its efficiency and versatility, suitable for both sealed and gel batteries. It features advanced MPPT technology which maximizes energy harvest from solar panels, ensuring optimal charging performance even in low-light conditions.
- Victron Energy SmartSolar MPPT 100/50: Renowned for its Bluetooth connectivity, this controller allows users to monitor their solar system remotely via a smartphone app. It also incorporates advanced MPPT technology for superior performance and can handle high voltage inputs, making it ideal for larger solar setups.
- Morningstar ProStar PS-30: This controller is celebrated for its durability and reliability, with a robust design that withstands harsh outdoor conditions. It features a built-in load control that protects batteries from over-discharge, ensuring longevity and optimal performance.
- EP Solar Tracer 4210RN: With a focus on high-efficiency performance, this controller is equipped with a dual-core microprocessor for precise tracking of solar inputs. It also offers a user-friendly LCD display for real-time data monitoring and supports multiple battery types, enhancing its versatility.
- Schneider Electric Conext MPPT 80 600: Designed for more extensive solar systems, this controller supports high voltage and offers advanced features, including a wide input voltage range. It is ideal for off-grid applications and integrates seamlessly with other Schneider Electric products for a complete energy solution.
How Can You Properly Install a Negative Ground Charger Controller?
To properly install a negative ground charger controller, you should follow these essential steps:
- Read the Manual: Always start by reading the manufacturer’s manual that comes with the charger controller to understand specific installation requirements and safety precautions.
- Gather Necessary Tools: Ensure you have all the tools needed for installation, including wire cutters, crimpers, electrical tape, and appropriate connectors.
- Disconnect the Battery: Before starting the installation, disconnect the negative terminal of the battery to prevent any electrical shorts or shocks during the process.
- Mount the Charger Controller: Choose a suitable location for mounting the controller, ensuring it is secure, accessible, and away from heat sources or moisture.
- Connect the Wires: Follow the wiring diagram provided in the manual to connect the positive and negative wires from the charger to the respective terminals on the battery.
- Check Connections: After making all connections, double-check to ensure they are tight and secure to prevent any loose wiring that could lead to malfunctions.
- Reconnect the Battery: Once all connections are verified, reconnect the negative terminal of the battery, ensuring no tools are left in the vicinity.
- Test the System: Finally, turn on the charger controller and check for proper operation, including indicator lights and charging functionality.
Reading the manual is crucial as it provides specific information regarding the model you are working with, including safety instructions and troubleshooting tips. Each charger controller may have unique features or requirements that need to be understood before installation.
Gathering necessary tools ensures you have everything you need at hand, which can streamline the installation process and prevent unnecessary interruptions. Common tools include wire cutters, crimpers for connectors, and electrical tape for securing connections.
Disconnecting the battery is a safety measure that protects you from electric shocks and prevents damage to the electrical system. Always remove the negative terminal first to minimize the risk of accidental short-circuits.
When mounting the charger controller, select a location that is not only secure but also allows for adequate airflow and easy access for future adjustments or troubleshooting. Avoid areas exposed to extreme temperatures or moisture, which could affect the unit’s performance.
Connecting the wires according to the wiring diagram is vital for ensuring that the charger controller functions correctly. Incorrect connections can lead to malfunction or damage, so it’s important to follow the manufacturer’s guidelines precisely.
After making connections, checking them ensures that everything is correctly installed. Loose or poorly connected wires can result in poor charging performance or safety hazards.
Once the battery is reconnected, it’s important to test the system to verify that the charger controller is operating as intended. Check for any indicator lights and ensure that the charging process begins as expected, as this confirms that the installation was successful.
What Maintenance Practices Can Extend the Lifespan of Your Charger Controller?
Implementing proper maintenance practices can significantly extend the lifespan of your negative ground charger controller.
- Regular Inspection: Frequent checks for physical damage, corrosion, or loose connections can help identify issues before they escalate. Ensuring that all components are secure and free from debris will enhance performance and longevity.
- Clean Connections: Keeping the terminals and connections clean from dirt, dust, and corrosion is essential for optimal conductivity. Use a suitable cleaning solution and a soft brush to maintain these areas, which reduces resistance and improves efficiency.
- Monitor Temperature: Charger controllers can be sensitive to temperature extremes, so monitoring their operating temperature is crucial. Ensure that the controller is installed in a well-ventilated area to prevent overheating, which can lead to failure.
- Proper Wiring Practices: Using the correct gauge of wire and ensuring all connections are tight can prevent voltage drops and overheating. Following manufacturer recommendations for wiring helps to maintain system integrity and reduces the risk of electrical issues.
- Regular Firmware Updates: Keeping the charger controller’s firmware up to date can improve functionality and security. Manufacturers often release updates that enhance performance or fix known bugs, ensuring your system operates at its best.
- Battery Maintenance: Since charger controllers are directly linked to battery performance, regularly checking and maintaining batteries can prevent undue stress on the charger. Ensure batteries are topped up, clean, and functioning well to prolong both the battery and charger controller lifespan.