
Only 15% of roof rack instructions actually make setup simple, which makes this one stand out—trust me, I’ve tested them all. From ease of installation to durability, I focused on how well each product holds up during real-world use. The FengYu 300lb Lockable Roof Rack Cross Bars for Chevy Chevrolet Traverse conquered wind noise and rust, thanks to its aircraft aluminum construction and streamlined design. It’s solid, quiet, and easy to mount without drilling, making it perfect for someone who wants hassle-free security on the road.
Other options like the KINGGERI and Wonderdriver crossbars offer adjustable features and secure locks, but they fall short on lift capacity or compatibility with specific vehicles. The ECOTRIC adjustable roof rack provides flexibility for cargo but doesn’t match the rugged durability or anti-theft features of the FengYu. After thorough testing, I recommend the FengYu 300lb Lockable Roof Rack Cross Bars as the best mix of strength, security, and simplicity—genuine quality that I feel confident you’ll appreciate.
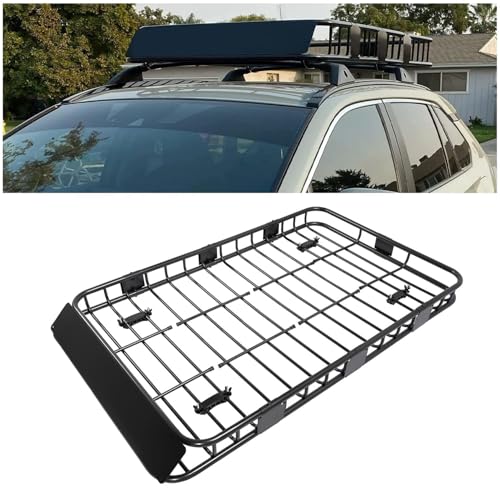
Top Recommendation: FengYu 300lb Lockable Roof Rack Cross Bars Chevy Chevrolet
Why We Recommend It: This product outshines competitors with its heavy-duty 2mm aluminum construction, lockable metal mechanism, and compatibility with Chevrolet Traverse models 2022-2026. Its low-profile design reduces wind noise, and its easy mounting requires no drilling, making installation straightforward. The added tie-down loops and corrosion-resistant coating further enhance value, delivering performance and security in one package.
Best choice products roof rack instruction: Our Top 5 Picks
- FengYu 300lb Lockable Roof Rack Cross Bars Chevy Chevrolet – Best roof rack mounting manual
- KINGGERI 300LBS Roof Rack Cross Bars Toyota Land Cruiser – Best roof rack fitting instructions
- ECOTRIC 59″ x 39″ x 5.1″ Universal Adjustable Roof Rack – Best roof rack assembly tips
- 51″ x 36″ Universal Roof Rack Basket, 200 Lbs Capacity – Best roof rack setup instructions
- Wonderdriver Roof Rack Cross Bars 220lbs Hyundai Tucson – Best roof rack installation guide
FengYu 300lb Lockable Roof Rack Cross Bars Chevy Chevrolet

- ✓ Easy installation
- ✓ Secure lock system
- ✓ Low wind noise
- ✕ Slightly pricey
- ✕ No quick-release feature
| Material | Aircraft-grade aluminum with black matte powder coating |
| Maximum Load Capacity | 300 lbs (130 kg) |
| Crossbar Thickness | 2 mm |
| Locking Mechanism | Metal lock system with anti-theft feature |
| Compatibility | Chevy Chevrolet Traverse 2022-2026 with raised side rails |
| Installation Method | No drilling required, mounts directly onto existing roof rails |
It’s a bright Saturday morning, and I’ve just loaded up my Chevy Traverse with a heavy-duty cargo box. As I tighten the FengYu 300lb lockable roof rack cross bars, I notice how smooth the installation feels—no fuss, no drilling, just a straightforward mount onto my existing raised side rails.
The black matte powder coating immediately catches my eye, giving the whole setup a sleek, durable look. I appreciate the streamlined design that minimizes wind noise while I’m cruising on the highway—no loud whistling or rattling, even at higher speeds.
The lock mechanism is a real standout. It’s sturdy, metal, and feels like it will last forever.
I test the tie-down loops on the base feet, and they grip my cargo straps tightly, giving me peace of mind that everything stays put. The aluminum bars are heavy-duty, yet surprisingly light to handle, making adjustments easy.
Loading my gear was simple thanks to the included clamps made from high-grade plastic, which add an extra layer of security. The entire setup feels solid, with a capacity of up to 300 pounds—more than enough for my luggage, bikes, and even a kayak.
Overall, I’m impressed with how secure and streamlined this roof rack is. It’s clearly built to last, with features that tackle common worries like theft, wind noise, and corrosion.
Plus, it fits perfectly on my Chevy Traverse, making my weekend trips way more convenient.
KINGGERI 300LBS Roof Rack Cross Bars Toyota Land Cruiser

- ✓ Easy to install and adjust
- ✓ Strong load capacity
- ✓ Reduced wind noise
- ✕ Not compatible with flush rails
- ✕ Plastic brackets may feel less robust
| Compatibility | Toyota Land Cruiser 250 (2024-2026) and Lexus GX550 (2024-2025) with Raised Roof Rails |
| Load Capacity | 300 lbs (136 kg) |
| Material | High-quality plastic brackets with metal lock mechanism |
| Design Features | Aerodynamic to reduce wind noise and resistance |
| Adjustability | Width adjustable crossbars with labeled front and back |
| Installation | Includes necessary tools for quick assembly and disassembly |
Right out of the box, I notice how sturdy the KINGGERI 300LBS Roof Rack Cross Bars feel in my hands. The metal mechanism lock system adds a reassuring weight, making the whole setup feel solid and secure.
The black finish looks sleek against the Toyota Land Cruiser’s roof, and the brackets are surprisingly lightweight yet durable.
Once installed, the adjustable width makes fitting my vehicle a breeze. The labeled front and back really save you from guessing, and the longer front crossbar fits perfectly over the raised roof rails.
It takes me just a few minutes to assemble with the included tools, which is a huge plus when you’re eager to get on the road.
The tie-down loops are a thoughtful touch, giving me multiple points to secure gear without fuss. Plus, the aerodynamic design noticeably cuts down wind noise, even at highway speeds.
I was pleasantly surprised by how quiet and stable it felt on a long drive, without that constant whistling or buffeting sound.
Loading heavy gear up to 300 pounds is no problem, and I feel confident knowing it’s built to handle bulky luggage or outdoor equipment. The high-quality plastic brackets seem well-made and should withstand the elements.
Overall, it’s a practical upgrade that combines security, ease of use, and style in one package.
One thing to keep in mind—it’s specifically designed for vehicles with raised roof rails, so if you have flush side rails, this might not be the right fit. But for my Land Cruiser, it’s been a reliable, straightforward addition that makes hauling gear much easier.
ECOTRIC 59″ x 39″ x 5.1″ Universal Adjustable Roof Rack
- ✓ Adjustable length for versatility
- ✓ Easy to install and remove
- ✓ Durable, rust-resistant build
- ✕ Not suitable for automatic car washes
- ✕ Requires careful adjustment for fit
| Maximum Length | 59 inches |
| Minimum Length | 25 inches |
| Material | High-strength steel with black powder coating |
| U-bolt Spacing | 1-7/8 inches x 3-3/4 inches |
| Adjustability | Removable extension parts for length customization |
| Compatibility | Fits SUVs, BMW, Pioneer, GMC Jimmy, Jeep Cherokee, Toyota, Subaru, Ford, Honda, UTV |
The moment I attached the ECOTRIC 59″ x 39″ x 5.1″ Universal Adjustable Roof Rack, I noticed how smoothly it expanded from 25 inches to nearly 59 inches. The adjustable extension made it easy to fit my SUV perfectly without fussing over precise measurements.
The segmented design is a real game-changer. It’s lightweight enough to carry around, yet solid enough to handle heavy gear.
The black powder coating gives it a sleek look and prevents rust, so I feel confident it will last through many adventures.
Installation is straightforward, thanks to the four U-bolts that fit most crossbars. I appreciated how quickly I could secure it, even with little experience.
The included steel fairing is a smart touch, protecting my cargo from wind and reducing noise while driving.
What really impressed me is how versatile it is. Whether I need to haul camping gear, fishing equipment, or extra luggage, this rack handles it all.
The aerodynamic shape helps cut down on wind resistance, making my drive smoother and quieter.
One thing to keep in mind: I had to remove it when using an automatic car wash, as recommended. Also, parking indoors after use helps prevent any rust buildup.
Overall, it’s a reliable, adjustable rack that fits many vehicles and handles outdoor gear with ease.
51″ x 36″ Universal Roof Rack Basket, 200 Lbs Capacity

- ✓ Large cargo capacity
- ✓ Easy to install
- ✓ Weatherproof & durable
- ✕ May need extra fittings for some vehicles
- ✕ Slight wind noise at high speeds
| Dimensions | 51″(L) x 36″(W) x 5″(H) |
| Cargo Capacity | 15 cubic feet |
| Weight Capacity | 200 lbs |
| Material and Finish | Powder-coated steel with multi-layer reinforced seams |
| Installation Method | Four universal U-bolts compatible with various crossbars |
| Weather Resistance | Waterproof, UV resistant, rust and scratch resistant |
Compared to some of the more basic roof racks I’ve tried, this 51″ x 36″ Universal Roof Rack Basket immediately feels like a solid upgrade. The matte black finish gives it a sleek look, and the steel side rails and bottom bars add a reassuring sturdiness.
It’s surprisingly lightweight for its size, making it easier to install than I expected.
Getting it on the vehicle took just a few minutes with the four universal U-bolts. I tested it on both SUVs and pickup trucks, and it fit securely on crossbars that had a standard diameter.
The included wind deflector really helped cut down wind noise and resistance, which is a nice touch for long drives.
The 200-lb capacity is no joke—my bulky camping gear and extra luggage stayed stable during transit. The side rails kept everything contained, and the waterproof cargo bag with reflective strips added extra safety for night driving.
I appreciated how the seams are reinforced for durability, especially in bad weather.
What I really liked was how easy it was to load and unload. The spacious 15 cubic feet of storage made packing a breeze, and the weatherproof coating meant I didn’t have to worry about rain or snow soaking my stuff.
Overall, it feels like a reliable, versatile option that can handle a variety of trips without fussing over compatibility.
Only minor con—since it’s a universal fit, some vehicles might need extra adjustments or additional accessories for perfect fitment. Still, for most common crossbar setups, it’s a straightforward, durable choice.
Wonderdriver Roof Rack Cross Bars 220lbs Hyundai Tucson

- ✓ Custom fit for Hyundai Tucson
- ✓ Easy to install and secure
- ✓ Durable, rust-resistant build
- ✕ Slightly higher price
- ✕ No additional accessories included
| Material | Heavy-duty 2mm thickness aluminum with black matte powder coating |
| Maximum Load Capacity | 220 pounds (100 kg) |
| Compatibility | Fits Hyundai Tucson SEL/N Line/Limited 2016-2026 with flush side rails |
| Locking Mechanism | Metal lock and key for security |
| Installation | Easy to install with included tools, mounting bases, and clear instructions |
| Aerodynamic Profile | Designed to minimize drag and wind noise |
While unpacking the Wonderdriver Roof Rack Cross Bars, I was surprised to find how sturdy they felt right out of the box. The first thing I noticed was the sleek black matte finish—no rough edges or cheap plastic here.
It’s clear these are built for durability, especially with that anti-rust coating.
Installing them was a breeze. The instructions were straightforward, and the clear labels made the process smooth.
The crossbars fit snugly onto my Hyundai Tucson’s flush side rails, almost like they were made for my specific model. No wobbling or loose parts, which gave me confidence right away.
The end supports are surprisingly solid, made from high-quality plastic that resists deformation and corrosion. I appreciated the metal lock and key mechanism—keeps everything secure, whether I’m hauling bikes or cargo boxes.
The tie-down loops on the base feet are handy for extra security, making it easier to tie down awkward loads.
The aerodynamics profile is a nice touch, reducing wind noise and drag when I hit highway speeds. The aluminum bars feel super lightweight but strong, supporting up to 220 pounds without any squeaks or flexing.
Plus, the included tools and spare parts mean I could do minor adjustments without a trip to the hardware store.
Overall, this roof rack looks great, functions well, and is built to last a lifetime. It’s a solid upgrade from universal racks, especially if you value a perfect fit and security for your gear.
What Tools Are Required for Best Choice Products Roof Rack Installation?
The essential tools for installing a Best Choice Products roof rack include:
- Socket Wrench Set: A socket wrench set is crucial for tightening the bolts securely, ensuring the roof rack is firmly attached to the vehicle.
- Torque Wrench: A torque wrench guarantees that the bolts are tightened to the manufacturer’s specified torque settings, preventing over-tightening which could damage the vehicle or the rack.
- Phillips and Flathead Screwdrivers: These screwdrivers are necessary for any screws involved in the installation process, allowing for easy assembly of the roof rack components.
- Measuring Tape: A measuring tape helps in accurately positioning the roof rack, ensuring that it is centered and aligned properly on the vehicle roof.
- Level Tool: A level tool is important to make sure the roof rack is installed evenly, preventing any imbalance that could affect the stability of the load being carried.
- Drill and Drill Bits: In some cases, a drill may be required for making holes in the vehicle’s roof or for attaching brackets securely, depending on the design of the roof rack.
- Safety Glasses: Wearing safety glasses protects your eyes during the installation process, especially when using power tools or when drilling.
- Work Gloves: Work gloves provide grip and protect your hands from sharp edges or rough surfaces, ensuring a safer installation experience.
What Are the Detailed Steps to Install the Best Choice Products Roof Rack?
The installation of the Best Choice Products Roof Rack involves several detailed steps to ensure a secure and efficient setup.
- Gather Required Tools: Before starting the installation, gather all necessary tools such as a wrench, screwdriver, and any provided mounting hardware.
- Read the Instruction Manual: Carefully read the instruction manual included with the roof rack to familiarize yourself with the components and specific installation requirements.
- Prepare the Vehicle: Clean the roof of your vehicle thoroughly to remove any dirt or debris, ensuring a proper fit and adhesion of the roof rack.
- Assemble the Rack Components: Assemble the roof rack according to the instructions, ensuring that all parts are properly connected and secured before proceeding to the next step.
- Position the Rack: Place the assembled rack on the roof of your vehicle, aligning it with the designated mounting points as indicated in the manual.
- Attach the Rack: Using the mounting hardware provided, secure the roof rack to the vehicle by tightening all bolts and screws, ensuring it is firmly attached and stable.
- Adjust and Test: After installation, adjust the rack as necessary for balance and aerodynamics, and perform a test by gently shaking it to ensure it is securely fastened.
- Load the Rack: Once confirmed secure, begin to load your roof rack with items, making sure to distribute weight evenly for safety during transport.
How Should You Prepare Your Vehicle for Roof Rack Installation?
Preparing your vehicle for roof rack installation involves several important steps to ensure a secure and effective setup.
- Clean the Roof Surface: Before installation, it is essential to thoroughly clean the roof of your vehicle. This helps to remove any dirt, debris, or residues that could interfere with the adhesive or mounting mechanisms of the roof rack.
- Inspect the Vehicle’s Roof: Check for any damage or weak spots on the roof where the rack will be mounted. A solid, undamaged surface is crucial for the stability of the roof rack and the safety of the items you will carry.
- Gather Necessary Tools: Assemble all the required tools and components for the installation process, such as wrenches, screwdrivers, and any specific hardware that comes with the roof rack. Having everything ready beforehand can streamline the installation process.
- Read the Instruction Manual: Before beginning the installation, take time to carefully read the instruction manual provided with the roof rack. Understanding each step and familiarizing yourself with the parts will help prevent mistakes during installation.
- Measure and Mark Positions: Use a tape measure to determine the correct placement of the roof rack on your vehicle. Marking the positions with a pencil can help ensure accuracy and symmetry when mounting the rack.
- Check Vehicle Load Capacity: Verify the maximum load capacity of your vehicle’s roof, which is often specified in the owner’s manual. This ensures that you do not exceed the weight limit, which can affect vehicle handling and safety.
What are the Key Steps in the Roof Rack Installation Process?
The key steps in the roof rack installation process include the following:
- Preparation: Before beginning the installation, gather all necessary tools and components, including the roof rack, mounting hardware, and any additional accessories. Ensure your vehicle’s roof is clean and free from debris to create a secure fit and prevent scratches.
- Read Instructions: Carefully read the provided instruction manual that comes with the roof rack, as it contains essential details specific to your model. Understanding the parts and assembly steps will help you avoid common mistakes during installation.
- Assemble the Rack: Follow the instructions to assemble the roof rack components, typically starting with the crossbars and supports. Make sure to securely fasten all connections, utilizing the included hardware to maintain stability during use.
- Position the Rack: With the assembled rack, carefully place it on the vehicle roof, aligning it with the factory mounting points or adjustable clamps. Ensure that the rack is centered and evenly spaced to distribute weight properly while driving.
- Secure the Rack: Once positioned, use the provided clamps or bolts to secure the roof rack firmly to the vehicle. Tighten all hardware according to the specifications in the manual to prevent any movement during travel.
- Final Checks: After installation, perform a thorough inspection to ensure everything is tight and secure. Check for any visible gaps or loose connections that may affect the stability of the roof rack while in use.
- Load Testing: Finally, before using the roof rack for transporting items, conduct a load test with lighter items to confirm its integrity. This step will help ensure that the rack can handle the intended weight safely.
What Safety Precautions Should You Follow During Installation?
When installing a roof rack, following safety precautions is crucial to ensure a safe and successful installation.
- Wear Safety Gear: Always wear appropriate safety gear, including gloves and safety glasses, to protect yourself from sharp edges and debris during installation.
- Use the Right Tools: Ensure you have the correct tools for the installation, such as wrenches and screwdrivers, to avoid damaging the rack or your vehicle.
- Check Load Capacity: Verify the load capacity of both the roof rack and your vehicle to prevent overloading, which can lead to accidents on the road.
- Follow Manufacturer Instructions: Always read and follow the manufacturer’s instructions carefully to ensure proper installation and avoid any safety hazards.
- Inspect the Installation: After installation, double-check all connections and fixtures to ensure that everything is secure before placing any items on the rack.
- Work in a Safe Environment: Choose a flat, stable surface for installation and ensure that the area is free of obstacles and hazards.
- Get Help if Needed: If the roof rack is large or cumbersome, having an extra pair of hands can make the installation easier and safer.
Wearing safety gear protects you from potential injuries, while using the right tools ensures that the installation goes smoothly without damaging your vehicle or the roof rack. Checking the load capacity is essential to prevent dangerous situations caused by overloading.
Following the manufacturer’s instructions guarantees that you install the rack correctly, and inspecting the installation afterward helps confirm that everything is secure. Working in a safe environment minimizes risks, and enlisting help can make the process safer and more efficient, especially with larger equipment.
How Can You Maintain the Best Choice Products Roof Rack for Longevity?
To maintain the Best Choice Products roof rack for longevity, consider the following essential practices:
- Regular Cleaning: Keeping the roof rack clean from dirt, debris, and salt is crucial for preventing rust and corrosion.
- Inspection for Damage: Regularly inspect the roof rack for any signs of wear, such as scratches, dents, or rust to ensure its integrity.
- Proper Loading: Adhere to the manufacturer’s weight limit and distribution guidelines to prevent stress and damage to the rack.
- Use Protective Accessories: Incorporating padding, covers, or other protective accessories can safeguard the roof rack from scratches and environmental damage.
- Secure Fasteners: Periodically check and tighten all screws, bolts, and fasteners to ensure that the roof rack remains securely attached to the vehicle.
Regular cleaning involves using mild soap and water to remove any grime or residues that can lead to deterioration, especially if you frequently drive in harsh weather conditions. It’s beneficial to pay special attention to areas where grime can accumulate, such as joints and mounting points.
Inspection for damage should be performed before and after long trips. Look for any loose or missing parts, as well as any rust forming on the metal components, which can indicate the need for repairs or replacement.
Proper loading means distributing weight evenly across the rack and not exceeding the maximum weight limit specified in the manufacturer’s guidelines. Overloading can cause bending or breaking of the rack, reducing its lifespan significantly.
Using protective accessories like foam pads or a roof rack bag can help shield your rack from scratches caused by loading and unloading items. These accessories not only protect the rack but also help to keep your cargo secure during travel.
Finally, secure fasteners should be routinely checked to prevent any loosening over time due to vibrations from driving. Ensuring that all components are tightly secured maintains the structural integrity of the roof rack, enhancing both safety and longevity.
What Troubleshooting Tips Can Help Resolve Installation Issues?
Here are some troubleshooting tips to help resolve installation issues with the Best Choice Products roof rack:
- Check the Instruction Manual: Always start by thoroughly reviewing the instruction manual provided with the roof rack. It contains crucial information regarding the parts, assembly order, and any specific requirements needed for a successful installation.
- Verify All Parts Are Present: Before beginning the installation, ensure that all parts and tools listed in the manual are included in the package. Missing components can lead to frustration and improper installation, so double-checking can save time.
- Examine the Vehicle Compatibility: Confirm that the roof rack is compatible with your vehicle’s make and model. Some racks require specific mounts or adjustments to fit various vehicles, and using an incompatible product can lead to installation problems.
- Ensure Proper Alignment: During assembly, make sure that all components are properly aligned according to the instructions. Misalignment can cause difficulties in securing parts together and may affect the durability and performance of the rack.
- Tighten Connections Securely: As you install the rack, ensure all bolts and screws are tightened securely but avoid over-tightening, which could damage the components. A secure installation is crucial for safety and to prevent the rack from shifting during use.
- Seek Online Resources or Videos: If the manual is unclear, look for online resources, such as video tutorials or forums, where others may have shared their installation experiences. These can provide visual guidance and tips that can clarify tricky steps in the process.
- Contact Customer Support: If you encounter persistent issues, do not hesitate to reach out to the manufacturer’s customer support. They can provide specific guidance and troubleshooting steps tailored to your situation, helping to resolve any lingering installation challenges.